
Mitsubishi Starion Pt. 1: STRION my best
The model building experience is one of ups and downs, much like any other project. Certain aspects of a model build are simply more pleasant than others. To a large extent, what is considered pleasant or not depends on the builder. Some people prefer the early stages of sanding, gluing, scratchbuilding, etc. Others prefer the painting. Still others enjoy the decaling process (the devious freaks!).
To most people though, one of the best parts of model building, is starting a project. Opening the box and taking a good look at what you have to work with. Taking in the model kit’s strong and weak points, planning out what is and isn’t worth doing, picking the colour scheme. It’s fun and exciting and ironically, many builds don’t make it past this first, most joyous step. What can I say then, about this Mitsubishi Starion kit. It was first released in 1982 by Fujimi. This particular box is a re-release from 1995. I’m not one to bash any particular model brand, though many are quite critical of Fujimi’s efforts, especially from 45ish years ago.

But I do find it odd, that even Fujimi didn’t give this release enough love to catch the typo, prominently displayed on the box. A bold “STRION” is what we start this build off with, and it doesn’t exactly fill me with confidence. As an aside, they got it right in all other releases of this model. To be honest, I had tried to sell this model off a few times before. Both online and at shows. I’ve been burned by these old Fujimi kits in the past and I didn’t feel like messing with another one. At least not one of a car I didn’t particularly care about. But it didn’t sell. And the more I looked at it, the more I came to appreciate its 80s wedge shaped charm.
What's in the box?
The kit includes two large regular sprues, the bodywork and chassis as separate pieces, one smaller sprue for the wheels and one clear sprue with the windows and lights. The decal sheet is yellowed due to age. The engineers at Fujimi have quite thoughtfully included pieces to make either the left-hand or right-hand drive model. They’ve also made it possible to cut out the headlight covers from the bodywork and install the lights in the pop-up position. Though the headlight pieces, moulded in clear plastic in one piece per side, do leave a lot to be desired. In the same vein, you can cut out the sunroof and use the suspiciously flat-looking clear piece in its stead. This is all well and good and all, but I would have appreciated them use the extra plastic on the clear sprue to include side windows. I guess the idea was you’d leave those “open”, so you can see the interior. Not uncommon in these older Japanese car model kits. I’m not much of a fan, but it is what it is.


The chassis is rudimentary and designed to accommodate an optional motor, which is also quite common in kits of this period. A real, electric motor that is. So that after you spend a couple months building it, you can send it straight into the nearest wall. Or down some stairs.
I’m not particularly knowledgeable about the Mitsubishi Starion, but the bodywork is a pleasant surprise. The shape seems more or less correct to my eyes, which is excellent news, because it’s the one thing that can ruin the look of a model and is a massive pain to fix. The details aren’t too bad either.
The plan
I always start my car model builds with the bodywork. This is because the painting process takes its time. Plenty of it to work on everything else later. While the bodywork is indeed quite decent, the limitations of these old kits leave us with plenty of room to improve. Moreso when you consider this is an enthusiast car, one whose owner would likely modify.
So here is the plan:
- sick 80s louvres covering the rear window
- cool auxiliary lights under the front bumper
- remake the front and rear vents
- dope little spoiler
- improve the rear light details
- improve the front light details
- remake the door handles
- pick and model some totally rad new wheels
This may seem like a lot, but not to worry, I have a method. One might even call it a workflow. It’s very simple and I encourage everyone to follow it.
Step one is, grab your expensive 3D scanner and scan the entire body. This will give you a rough representation of your model to use as a reference.
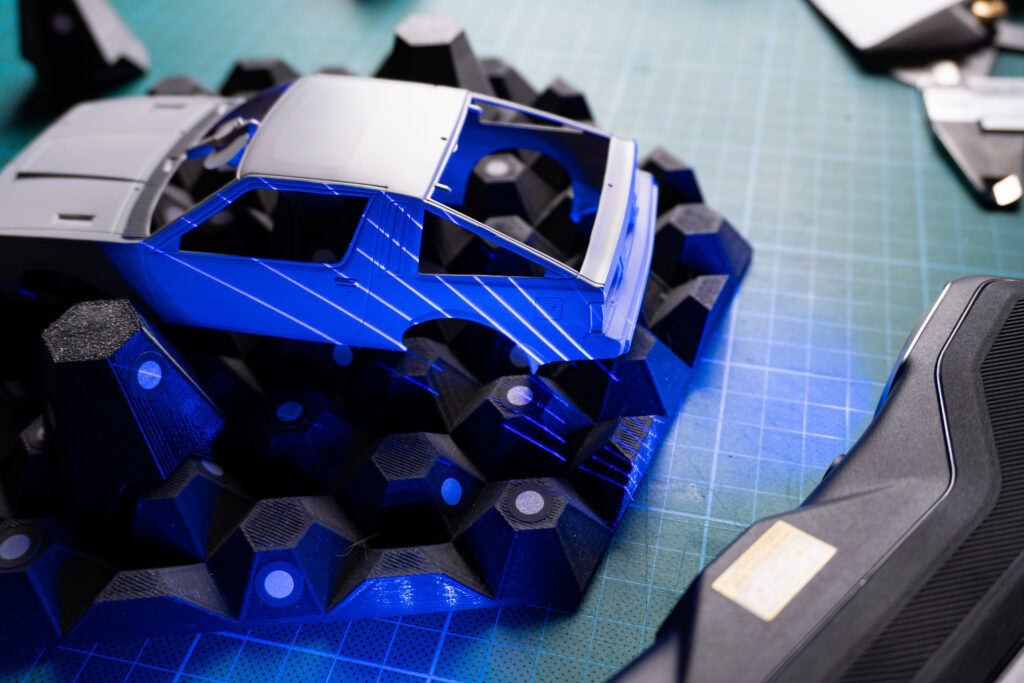
Step two is to use your CAD modelling experience to create all the additions you need.

Step three is to use your resin printer to 3D print the new pieces.

Okay, I’ll admit that the workflow might not be appropriate for most model builders, but I have just the right mix of expendable income, engineering experience and friends with resin printers, for it to work. Consider that last part a preview as I’ll be going into more details about the CAD additions in a future post
Thanks for reading!